通过yum源安装nginx
前置依赖,安装这个的目的是可以使用sudo yum-config-manager --enable nginx-mainline命令
1 | sudo yum install yum-utils |
创建yum仓库配置文件
/etc/yum.repo.d/nginx.repo
1 | [nginx-stable] |
安装nginx
1 | sudo yum install nginx |
前置依赖,安装这个的目的是可以使用sudo yum-config-manager --enable nginx-mainline命令
1 | sudo yum install yum-utils |
创建yum仓库配置文件
/etc/yum.repo.d/nginx.repo
1 | [nginx-stable] |
安装nginx
1 | sudo yum install nginx |
Promise最大的好处是在异步执行过程中,把执行代码逻辑和处理请求后的结果分离了,解偶合了。
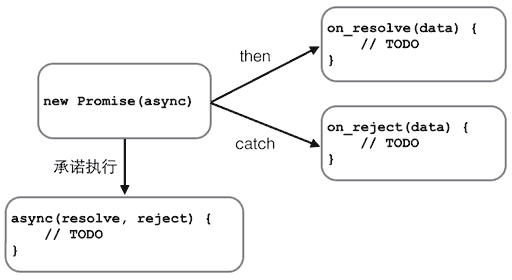
执行代码逻辑,比如请求api后,返回http code 200怎么做,返回400又怎么做。
可以把如下代码复制到Chrome的Console里面执行。
1 | new Promise(function(resolve, reject) { |
高德开放平台下的天气查询接口文档
https://lbs.amap.com/api/webservice/guide/api/weatherinfo
注册开发者账号,获取Key
1 | https://restapi.amap.com/v3/weather/weatherInfo?parameters |
parameters代表的参数包括必填参数和可选参数。
https://restapi.amap.com/v3/weather/weatherInfo?key=[key]&city=310115
返回结果:
1 | { |
百度api是jsonp的方式获取数据,而高德地图的api是允许跨域的。