hexo博客在百度搜索引擎上的链接提交
想让自己的博客被百度搜索引擎尽快收录,并在搜索时排在前面一些,那就需要及时提交博客的URL。
主要有三种提交方法,大家最好三种都用,这也是官方推荐的,不会有任何冲突。
主动推送
主动推送是实时的,能让百度在第一时间知道你的原创内容。
首先要安装hexo-baidu-url-submit插件。
在博客根目录下执行如下命令:
1 | sudo npm install hexo-baidu-url-submit --save |
然后在根目录中的_config.yml文件内容最后,添加如下内容:
count为提交Url的数量。
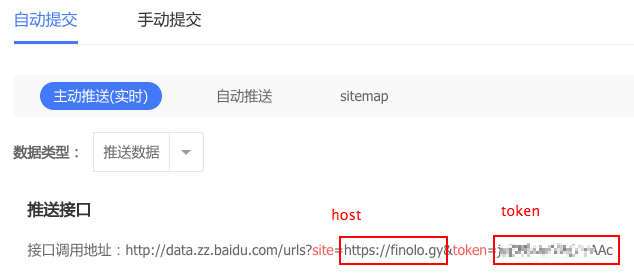
host为博客的地址。
token这也可以在百度网站上找到。
1 | # Baibu url submit |
最后在Deploy标签下加入buidu_url_submitter
1 | deploy: |
在hexo generate时,会产生.deploy_git/baidu_urls.txt文件。
hexo deploy时,会从上述文件中读取urls,提交到百度。
成功以后,一般会返回类似这样的信息。remain为今天剩余可推送urls数量,success为成功推送的urls数量。
1 | {"remain":99602,"success":149} |
自动推送
在themes/<your_theme>/_config.yaml中,把baidu_push标签的值设置为true。
这时,系统会调用到themes/<your_theme>/layout/_third-party/seo/baidu-push.swig文件。
Sitemap
安装插件
1 | npm install hexo-generator-sitemap --save |
然后把http://<domain>/baidusitemap.xml和http://<domain>/sitemap.xml提交到百度sitemap页面即可。